I've had some requests in the past for the pattern to the little pug I make. The problem is, I didn't have a pattern (like most of my creations, it's something I figured out as I went and then replicated it as best I could for additional ones), so I sat down yesterday and made a couple of pugs so that I could write down my pattern. So, here it is!
This is a really simple and straight-forward pattern, and so it can be easily customized to make your pug different shapes and sizes. Just add or remove increase rows on the body and legs, and add or remove stitches on the other body parts to make your little pug bigger or smaller. You can even position the ears in different ways. I did on these guys -- the bigger guy's ears go to the sides, the smaller one's ears face the front. So, just have fun with it! If you're new to the whole amigurumi-thing, this is a good project to start out on. Small and simple. If you have any questions or need for help making customizations, let me know!

Mini Crochet Pug Pattern
**I've made this pug and pattern in two sizes and will note the differences in the pattern below**Size:
*The larger pug is approx. 2" wide x 3.25" tall x 3.25" long. The smaller pug is approx. 1.75" wide x 2.5" tall x 2.75" long.
Supplies:
*Caron Simply Soft worsted weight (size 4) yarn in Bone
*Red Heart Super Saver worsted weight (size 4) yarn in Black
*Size E/4 3.50 mm crochet hook
*10 mm/9 mm safety eyes (I used 10 mm for the bigger pug, 9 mm for the smaller one) [if you don't have safety eyes, and don't really want to buy any, you can use buttons instead. It will obviously give a bit of a different look, but hey, it works.]
*polyester stuffing
*yarn needle
*stitch marker or a piece of yarn in a contrasting color to mark the beginning of each row (so you don't lose your place!)
Terms:
*mc = magic circle (aka Magic Ring)
*sc = single crochet
*inc = increase (two single crochets in one stitch)
*dec = decrease (joining two previous single crochets together and making them one single crochet)
*ch = chain stitch
*sts = stitches
**This pattern will be worked in the round (meaning continuous working, no joining with slip stitches at the beginning of each row) unless otherwise noted.**
PATTERN:
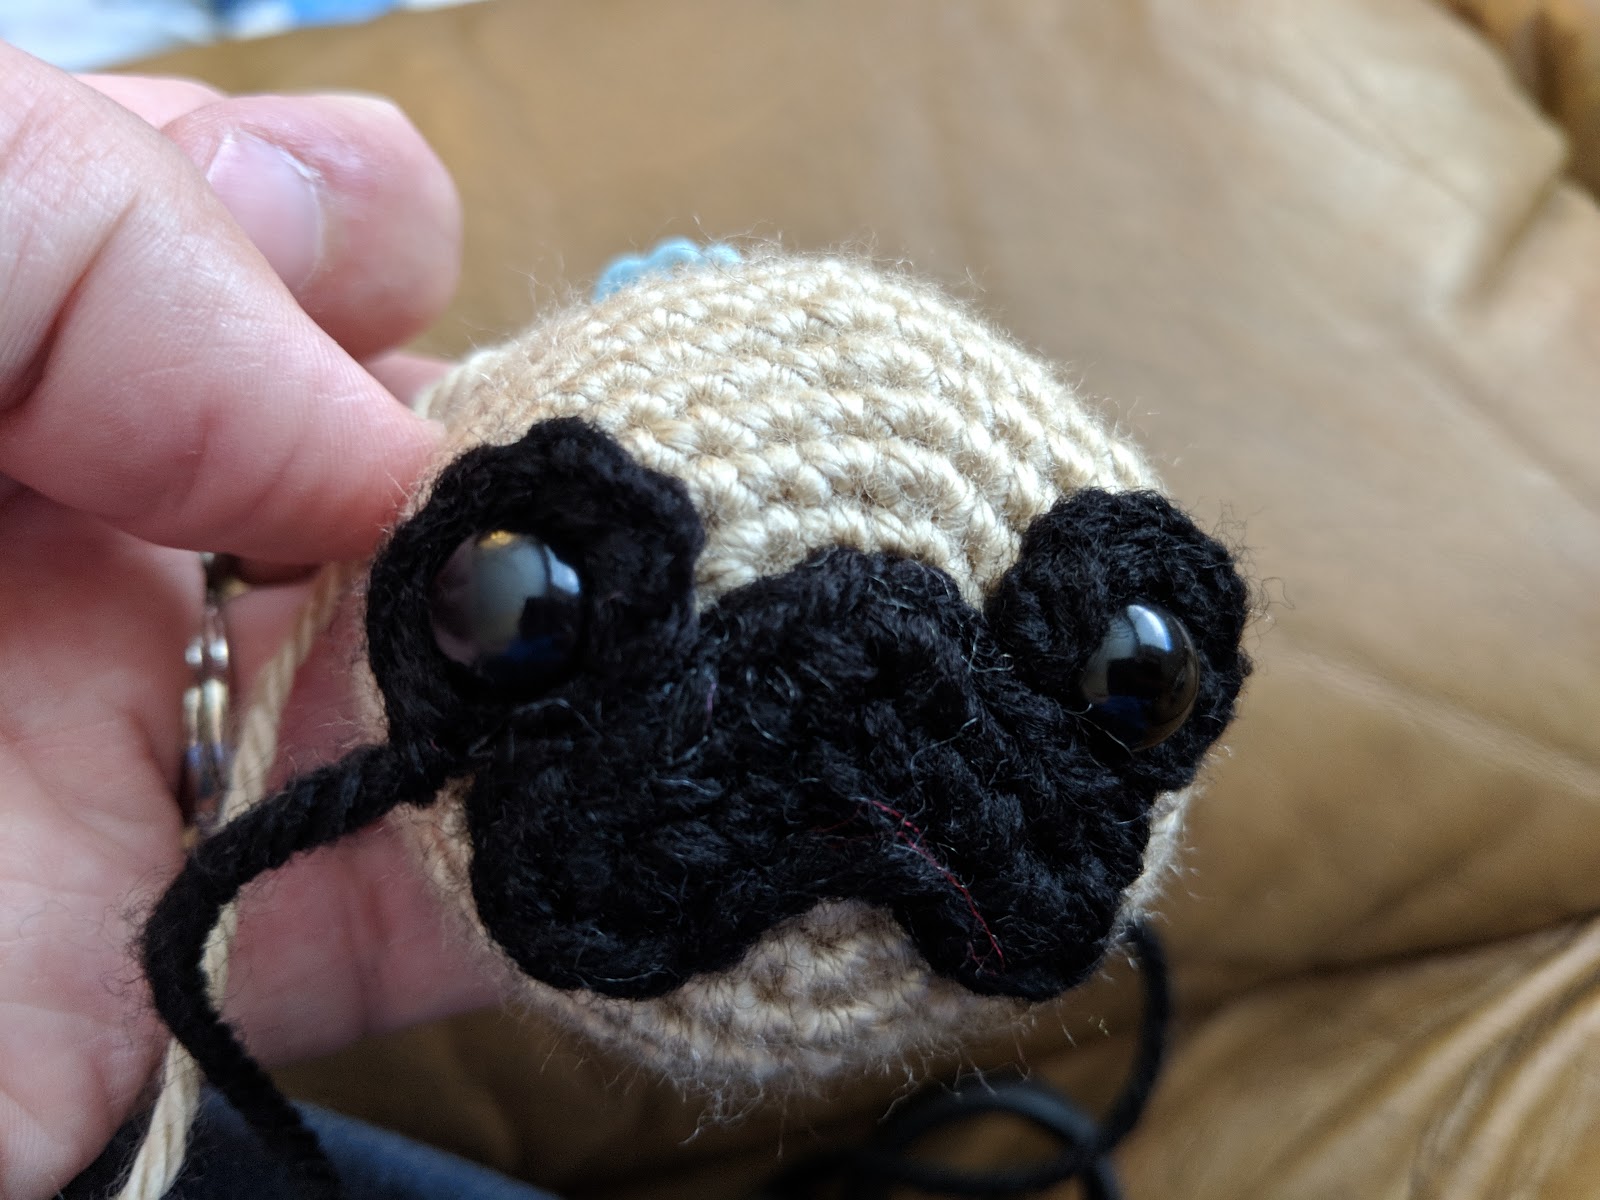
Mouth (using Black yarn) [larger pug]:
ch 8; in 2nd ch from hook, sc 3; sc 1 into each of the next two sts; sc 2 into the next stitch; sc 1 into each of the next two sts; sc 6 into the last stitch; turn work and continue working on the other side of the chain; sc 1 in the next stitch; join the next 3 stitches together with a decrease sc; sc 1 into the next stitch; sc 3 into the last stitch (this is the same space as where you started with the first 3 sc). Slip stitch into the top of the first sc and finish off, leaving a long tail for sewing onto the body.


Mouth (using Black yarn) [smaller pug]:
ch 6; in 2nd ch from hook, sc 3; sc 1 in next st, 2 sc in next st, sc 1 in next st, 5 sc in last st; turn work and continue working on the other side of the chain; join next 2 sts together with a dec sc, sc 1 in next st, sc2 into the last st (this is the same space as where you started with the first 3 sc). Slip stitch into the top of the first sc and finish off, leaving a long tail for sewing onto the body.
Eyes (using Black yarn) (Make 2) [same for both pugs]:
mc; sc 6 into circle. Pull closed slightly, but don't close the circle all the way. Finish off and leave a long tail for sewing. Insert safety eyes into holes in the circle, and attach to face, securing the safety eye to the body with the eye backing inside the body.

Ears (using Black yarn) (Make 2) [same for both pugs]:
**The Ch 1 spaces you make at the end of each row do NOT count as a stitch. They're simply there to add height to your piece as you move up to the next row. Do not crochet into them.
Row 1: leaving a nice long tail of yarn, ch 5; starting in the 2nd ch from hook, sc 1 into each st space. Ch 1 and turn your work (4 sts)
Row 2: dec, sc 1 into each of the next 2 sts. Ch 1 and turn. (3 sts)
Row 3: dec, sc 1 into next st. Ch 1 and turn (2 sts)
Row 4: dec. (1 st)
**Finish off and weave in the end you were just working on. Leave starting tail for sewing ears onto body.

Body (using Bone yarn) [larger pug]:
Row 1: mc; sc 6 into circle, pull gap closed (6 sts)
Row 2: inc around (12 sts)
Row 3: sc, inc; repeat pattern all the way around (18 sts)
Row 4: sc, sc, inc; repeat pattern all the way around (24 sts)
Row 5: sc, sc, sc, inc; repeat pattern all the way around (30 sts)
Row 6; sc, sc, sc, sc, inc; repeat pattern all the way around (36 sts)
Rows 7-19: sc in each stitch around (36 sts/row)
**At this point, attach the mouth, eyes, and ears, and then start to stuff as you continue the pattern.**
Row 20: sc, sc, sc, sc, dec; repeat pattern all the way around (30 sts)
Row 21: sc, sc, sc, dec; repeat pattern all the way around (24 sts)
Row 22: sc, sc, dec; repeat pattern all the way around (18 sts)
Row 23: sc, dec; repeat pattern all the way around (12 sts)
Row 24: decrease all the way around (6 sts)
**Finish off and weave in the ends.


Body (using Bone yarn) [smaller pug]:
Row 1: mc; sc 6 into circle. Pull closed. (6 sts)
Row 2: inc around (12 sts)
Row 3: sc, inc; repeat pattern all the way around (18 sts)
Row 4: sc, sc, inc; repeat pattern all the way around (24 sts)
Row 5: sc, sc, sc, inc; repeat pattern all the way around (30 sts)
Rows 6-17: sc in each stitch around (30 sts/row)
**At this point, attach the mouth, eyes, and ears, and then start to stuff as you continue the pattern.**
Row 18: sc, sc, sc, dec; repeat pattern all the way around (24 sts)
Row 19: sc, sc, dec; repeat pattern all the way around (18 sts)
Row 20: sc, dec; repeat pattern all the way around (12 sts)
Row 21: dec around (6 sts)
**Finish off and weave in the ends.
Tail (using Bone yarn) [same for both pugs]:
ch 5; starting in the 2nd ch from the hook, sc 4 into each of the 4 ch spaces (16 sts)
**Finish off and leave a long tail for sewing.
***Due to the amount of stitches you're putting in each space, the tail will want to curl up a little on it's own. That's good! But, you may need to help it out the rest of the way to complete the curl. Just grab each end of the tail and twist them towards and past each other, creating a curlicue out of the tail. Attach it at the top-back of your little pug!


Legs (using Bone yarn) (Make 4) [larger pug]:
Row 1: mc; sc 6 into circle; pull closed (6 sts)
Rows 2-5: sc 1 into each st (6 sts/row)
**Finish off, leaving a long tail for sewing onto the body.
Legs (using Bone yarn) (Make 4) [smaller pug]:
Row 1: mc; sc 6 into circle; pull closed (6 sts)
Rows 2-4: sc 1 into each st (6 sts/row)
**Finish off, leaving a long tail for sewing onto the body.
Now, sew all of your little guy's body parts together and you're done! Wasn't that so easy??


This is the bigger guy!


This is the smaller one!


I hope you enjoy making oodles of these little cuties!
Feel free to give away or sell what you make from this pattern, but DO NOT claim this pattern as your own, adjust the pattern and re-brand it as your own, or sell this pattern. Also, please DO NOT use any of my photos. Thank you!!
Thank you for the pattern these are adorable 😊
ReplyDeleteI love these and my 3 nieces love the thankyou
ReplyDeleteCasinos that Accept Us - CasinoTopOS.org
ReplyDeleteCasinos 온라인 포커 추천 that Accept Us. Casinos that Accept Us. We 켈로나 개조 offer the most reputable and reputable 업소 사이트 online 룰렛 돌리기 casino sites, as 호반 그래프 well as a plethora of other
Thank you so much for this adorable pattern. I made some for me and a couple of dear friends of mine. Linda Zumwalt
ReplyDelete