Sunday, July 22, 2018

Crochet Towel Topper/Hanger

I don't know about you, but I absolutely HATE when I dry my hands (or, most often, when my kids dry theirs) and I have to hang the hand towel back up because it's fallen off the towel bar. SO ANNOYING!! I used to constantly find my kitchen hand towels on the floor because my older son used to love to pull them down when he was a baby. He thought it was a fun game. Then, I discovered how to make something that changed my life forever: Crochet Hand Towel Toppers!
These things are so nice. They keep your towels off the floor and where you want them. And, best of all, they're really quick and super easy to make! I'll give you some tips and tricks (along with a pattern, of course) to help you make your very own with towels your already have!
I'm giving an actual pattern here, but this is highly adjustable depending on the size of your towel, button, etc. I made 20 guiding holes in my towel, so my pattern is based off of that number. If you adjust it, try to stick to even numbers, it will make it easier as you adjust along the way. If you have any questions, just let me know!

*Crochet Towel Topper*

Supplies:

  • Hand towel
  • Medium weight (4) cotton yarn  **I used Peaches & Creme brand yarn.
  • Size F-5 3.75mm crochet hook (any size hook will do, as long as it fits in the guiding holes you make on your towel. Bigger hooks will result in a bigger/bulkier/taller/wider topper, smaller hooks will do the opposite. You get the gist.)
  • Slim yarn needle (make sure it fits through the holes on the button you chose, or you can opt to sew on the button with a regular needle and thread.)
  • Button  **I used a 1.5 inch wooden button 
  • Scissors (or something to make guiding holes in your towel.)  **I used a rotary cutter fitted with a 45mm perforating blade.
Terms You'll Need to Know:
  • sts -- stitches
  • ch -- chain stitch
  • hdc -- half double crochet
  • hdc2tog -- half double crochet two stitches together
  • tr -- treble (or triple) crochet

LET'S GET STARTED!

To Begin:  Start by folding the towel the way you want it to hang. I folded mine perfectly in half lengthwise. Use your scissors, rotary cutter with perforating blade, or whatever you have to cut holes near the top of your towel (in my case, right by the fold), about 1/4-1/2 of an inch from the top edge. **If you're using scissors, make the holes about 2/3-3/4 of an inch apart. ***If you're using a rotary blade, you'll be crocheting into every other hole that gets cut into the fabric. Meaning, you'll be skipping one hole after each crochet stitch. Hopefully that makes sense.
  
I used scissors to widen the guiding holes in my towel so I could see them better.
I secured my towel on each end with stitch markers to try to keep the towel from moving too much while I crocheted the first row.

Row 1:  Attach your yarn into the first hole on the right using a slip stitch. Ch 1 and hdc into the same hole. hdc into each hole across. Ch 2 and turn. (20 sts) **again, if you're using a rotary cutter with perforating blade, hdc into every other hole.

Row 2:  hdc, hdc, hdc, hdc2tog; repeat to the end of the row. Ch 2 and turn. (16 sts)
Row 3:  hdc2tog in each pair of stitches across the row. Ch 2 and turn. (8 sts)
Row 4:  hdc in each stitch across. Ch 3 and turn. (8 sts)
Row 5:  tr in first 3 stitches. Ch 2 and skip the next 2 stitches. tr in last 3 stitches. Ch 3 and turn. (6 sts & 2 ch sts)  **this is your button hole!
Row 6:  tr in each stitch across, including the 2 chain sts in the middle. Ch 3 and turn. (8 sts)
Rows 7-10:  tr in each stitch across. Ch 3 and turn. At the end of the last row, only ch 2 and turn.  ***If you're making this for a thin towel bar, you only need to make rows 7 & 8 and then move on to Rows 11 & 12. If you're making it for a larger bar, like the oven door handle or thick towel bar, make rows 7-10.
Rows 11 & 12: hdc in each stitch across, ch 2 and turn between rows. At the end of row 12, finish off, leaving a long tail for attaching button. If you're using a needle and thread to attach the button, just leave a long enough tail of yarn to weave in the ends.

Find the back side of your towel and have it facing you. My towel is plain, so I just randomly chose a back side. Weave the yarn straight through the tops of the first 4 stitches, attach the button so it's facing you, then continue to weave the yarn through the remaining 4 stitches. Sew in the end to secure it in place. Weave in the starting end of the yarn.

And, you're done!


To hang the towel, have the front facing you and wrap the towel topper over the bar from front top to back bottom and hook button through the hole you created in row 5. Now, revel in how awesome you are.

I've made a dozen different towel toppers with different sized buttons and with the towel folded (or not folded) in different ways. and the toppers always work like a charm. These things are truly magical.
Feel free to share your creations (and even variations on the pattern!) in the comments below!

Saturday, April 28, 2018

Slouchy Sweater Pattern

Today I'm sharing my sweater pattern. This is a sweater that I've made a bunch of times now, and it's SO easy!! Basically, it's two rectangles joined, and sleeves are added. I'm going to share my tricks on how you can customize it (including sleeve lengths) to fit anyone! There's going to be a LOT of explaining throughout my pattern, so I apologize profusely in advance. If all this gibberish is much too confusing, feel free to ask for clarification. I'm happy to help!

I'll be sharing my basic Women's Small/Medium size sweater pattern. On this pattern, I've tapered the sleeves as it goes down the arm for a more custom fit, but the sleeves can easily be made one width all the way down. Also, you can easily make this a short sleeve, 1/2 sleeve, 3/4 sleeve, or even sleeveless shirt. The hardest part about this shirt is getting together the measurements you need. If you can't get your hands on the measurements for the person you're making this for, there are TONS of comprehensive measurement guides all over Pinterest that I've found extraordinarily helpful. All you would need in those cases is to know about what size the person is (S, M, L, etc).

This is a sweater I made for my sister. Hers is 2.5" shorter than the finished length of the pattern I provided below. 
Thank you, Christina, for the picture!!
Slouchy Sweater - Women's Sm/Med 
(Finished size of product is 39" wide around (~19" straight across) x 25.5" long)

What You'll Need:
  • Chest measurement & hip measurement (I get both and see which is bigger and go with that one. You can also get both, along with a waist, shoulder-to-chest, & shoulder-to-waist measurement, and then make the sweater more custom-fitting)
  • Shoulder-to-wrist measurement (or shoulder-to-wherever you want the sleeve to end)
  • Shoulder-to-hem measurement (from the top of the shoulder to where you want the shirt to end).
  • Neckhole measurement (The measurement I use is from collar bone on one side, across the neck, to the collar bone on the other side. You can also use a head-circumference measurement and divide by 2.)
  • Yarn (for my pattern, I use weight 3 [light] yarn. My absolute favorite to use is Baby Bee Sweet Delight yarn from Hobby Lobby. SO many colors to choose from, and it's SO, SO soft!) **For this Women's Sm/Med, I use about 2 1/2 skeins [approx. 940 yards] of yarn. 
  • I-9/5.50 MM crochet hook
  • Yarn needle
  • Stitch markers
Terms You'll Need To Know:
  • fhdc = foundation half-double crochet. I've got a video on how it's done. It's easier than it sounds, I promise!
  • hdc = half-double crochet
  • sl st = slip stitch
  • st / sts = stitch or stitches
  • dec = decrease 
  • ch = chain stitch (these are not counted as regular stitches)
Let's get started!

Body (make 2):
Row 1: leavings a long tail of yarn, fhdc 66. Ch 2 and turn. (66 sts)
Rows 2-68: hdc in each stitch across, ending each row with a ch 2 and turning your work. (66 sts/row)
*Finish off and leave a long tail for sewing top seams together

**Lay right sides together and with stitch markers (or pins, whatever you have), mark out the two edges of your neckline. Now, there really aren't "right sides" to this piece, as you alternate from front to back on the rows. This is simply so you remember to sew it all the right direction and remember to flip your work so the seams are on the inside. Sew top edges together (shoulders) with a blanket stitch, using the long tail of yarn you left at the end of your work, from each edge, ending at the closest stitch marker for the neckline. Finish off and weave in ends.
Now, use stitch markers to mark the bottom of your armhole openings. For this pattern, I left 22 sts unsewn on each side.  Sew up the sides of your work with the long tail of yarn you left at the beginning of your work - which is now at the bottom of your sweater - using a whip stitch. Stop at your stitch marker, finish off, and weave in ends.
Flip your work right-side out, and move on to your sleeves.

Sleeves (repeat pattern for both armholes):
**Sleeves are worked in the round. There is no joining or slip stitching your work, you just continue on from one row to the next. 
Row 1: attach yarn to the bottom of the armhole using a sl st. Hdc 43 sts, spaced evenly, around the armhole edge (what I find easiest is to do one hdc on the end of each row of stitches on the shirt, doing the top two -where the shoulder seam is- together in a decrease stitch. This creates nice, even spacing and doesn't leave any big gaps open). (43 sts)
Rows 2-23: hdc in each st across. (43 sts/row)
Row 24: hdc, hdc, hdc, hdc, hdc, hdc, dec, hdc, hdc, hdc, hdc, hdc, hdc, dec, hdc, hdc, hdc, hdc, hdc, hdc, dec, hdc, hdc, hdc, hdc, hdc, hdc, dec, hdc, hdc, hdc, hdc, hdc, hdc, dec, hdc, hdc, hdc (38 sts)
Rows 25 - 32: hdc in each st across (38 sts/row)
Row 33: hdc, hdc, hdc, hdc, hdc, dec, hdc, hdc, hdc, hdc, hdc, dec, hdc, hdc, hdc, hdc, hdc, dec, hdc, hdc, hdc, hdc, hdc, dec, hdc, hdc, hdc, hdc, hdc, dec, hdc, hdc, hdc (33 sts)
Rows 34-39: hdc in each st across (33 sts/row)
Row 40: hdc, hdc, hdc, hdc, dec, hdc, hdc, hdc, hdc, dec, hdc, hdc, hdc, hdc, dec, hdc, hdc, hdc, hdc, dec, hdc, hdc, hdc, hdc, dec, hdc, hdc, hdc (28 sts)
Rows 41-55: hdc in each st across (28 sts/row)
*Finish off and weave in ends.

And that's it! Seriously, this pattern looks scary, but it's so easy. Remember, customizing is easy, too. Just make sure to measure your work as you go, and keep track of your stitches.
Have fun!!

Remember, you're free to sell or give away anything you make using my free patterns. Please do not sell my patterns or rebrand them as your own. And please, do not use any of my photos. Thank you!

Sunday, April 22, 2018

Mini Pug Crochet Pattern

Hey all!

I've had some requests in the past for the pattern to the little pug I make. The problem is, I didn't have a pattern (like most of my creations, it's something I figured out as I went and then replicated it as best I could for additional ones), so I sat down yesterday and made a couple of pugs so that I could write down my pattern. So, here it is! 
This is a really simple and straight-forward pattern, and so it can be easily customized to make your pug different shapes and sizes. Just add or remove increase rows on the body and legs, and add or remove stitches on the other body parts to make your little pug bigger or smaller. You can even position the ears in different ways. I did on these guys -- the bigger guy's ears go to the sides, the smaller one's ears face the front. So, just have fun with it! If you're new to the whole amigurumi-thing, this is a good project to start out on. Small and simple. If you have any questions or need for help making customizations, let me know!


Mini Crochet Pug Pattern
**I've made this pug and pattern in two sizes and will note the differences in the pattern below**

Size:

*The larger pug is approx. 2" wide x 3.25" tall x 3.25" long. The smaller pug is approx. 1.75" wide x 2.5" tall x 2.75" long.

Supplies:

  *Caron Simply Soft worsted weight (size 4) yarn in Bone
  *Red Heart Super Saver worsted weight (size 4) yarn in Black
  *Size E/4 3.50 mm crochet hook
  *10 mm/9 mm safety eyes (I used 10 mm for the bigger pug, 9 mm for the smaller one) [if you don't have safety eyes, and don't really want to buy any, you can use buttons instead. It will obviously give a bit of a different look, but hey, it works.]
  *polyester stuffing
  *yarn needle
  *stitch marker or a piece of yarn in a contrasting color to mark the beginning of each row (so you don't lose your place!)

Terms:

  *mc = magic circle (aka Magic Ring)
  *sc = single crochet
  *inc = increase (two single crochets in one stitch)
  *dec = decrease (joining two previous single crochets together and making them one single crochet)
  *ch = chain stitch
  *sts = stitches

**This pattern will be worked in the round (meaning continuous working, no joining with slip stitches at the beginning of each row) unless otherwise noted.**

PATTERN:

Mouth (using Black yarn) [larger pug]:

ch 8; in 2nd ch from hook, sc 3; sc 1 into each of the next two sts; sc 2 into the next stitch; sc 1 into each of the next two sts; sc 6 into the last stitch; turn work and continue working on the other side of the chain; sc 1 in the next stitch; join the next 3 stitches together with a decrease sc; sc 1 into the next stitch; sc 3 into the last stitch (this is the same space as where you started with the first 3 sc). Slip stitch into the top of the first sc and finish off, leaving a long tail for sewing onto the body.


Mouth (using Black yarn) [smaller pug]:

ch 6; in 2nd ch from hook, sc 3; sc 1 in next st, 2 sc in next st, sc 1 in next st, 5 sc in last st; turn work and continue working on the other side of the chain;  join next 2 sts together with a dec sc, sc 1 in next st, sc2 into the last st (this is the same space as where you started with the first 3 sc). Slip stitch into the top of the first sc and finish off, leaving a long tail for sewing onto the body. 

Eyes (using Black yarn) (Make 2) [same for both pugs]:

mc; sc 6 into circle. Pull closed slightly, but don't close the circle all the way. Finish off and leave a long tail for sewing. Insert safety eyes into holes in the circle, and attach to face, securing the safety eye to the body with the eye backing inside the body.


Ears (using Black yarn) (Make 2) [same for both pugs]:
**The Ch 1 spaces you make at the end of each row do NOT count as a stitch. They're simply there to add height to your piece as you move up to the next row. Do not crochet into them.

Row 1: leaving a nice long tail of yarn, ch 5; starting in the 2nd ch from hook, sc 1 into each st space. Ch 1 and turn your work (4 sts)
Row 2: dec, sc 1 into each of the next 2 sts. Ch 1 and turn. (3 sts)
Row 3: dec, sc 1 into next st. Ch 1 and turn (2 sts)
Row 4: dec. (1 st) 
**Finish off and weave in the end you were just working on. Leave starting tail for sewing ears onto body.


Body (using Bone yarn) [larger pug]:

Row 1: mc; sc 6 into circle, pull gap closed (6 sts)
Row 2: inc around (12 sts)
Row 3: sc, inc; repeat pattern all the way around (18 sts)
Row 4: sc, sc, inc; repeat pattern all the way around (24 sts)
Row 5: sc, sc, sc, inc; repeat pattern all the way around (30 sts)
Row 6; sc, sc, sc, sc, inc; repeat pattern all the way around (36 sts)
Rows 7-19: sc in each stitch around (36 sts/row)
**At this point, attach the mouth, eyes, and ears, and then start to stuff as you continue the pattern.**
Row 20: sc, sc, sc, sc, dec; repeat pattern all the way around (30 sts)
Row 21: sc, sc, sc, dec; repeat pattern all the way around (24 sts)
Row 22: sc, sc, dec; repeat pattern all the way around (18 sts)
Row 23: sc, dec; repeat pattern all the way around (12 sts)
Row 24: decrease all the way around (6 sts)
**Finish off and weave in the ends.


Body (using Bone yarn) [smaller pug]:

Row 1: mc; sc 6 into circle. Pull closed. (6 sts)
Row 2: inc around (12 sts)
Row 3: sc, inc; repeat pattern all the way around (18 sts)
Row 4: sc, sc, inc; repeat pattern all the way around (24 sts)
Row 5: sc, sc, sc, inc; repeat pattern all the way around (30 sts)
Rows 6-17: sc in each stitch around (30 sts/row)
**At this point, attach the mouth, eyes, and ears, and then start to stuff as you continue the pattern.**
Row 18: sc, sc, sc, dec; repeat pattern all the way around (24 sts)
Row 19: sc, sc, dec; repeat pattern all the way around (18 sts)
Row 20: sc, dec; repeat pattern all the way around (12 sts)
Row 21: dec around (6 sts)
**Finish off and weave in the ends.

Tail (using Bone yarn) [same for both pugs]:

ch 5; starting in the 2nd ch from the hook, sc 4 into each of the 4 ch spaces (16 sts)
**Finish off and leave a long tail for sewing. 
***Due to the amount of stitches you're putting in each space, the tail will want to curl up a little on it's own. That's good! But, you may need to help it out the rest of the way to complete the curl. Just grab each end of the tail and twist them towards and past each other, creating a curlicue out of the tail. Attach it at the top-back of your little pug!


Legs (using Bone yarn) (Make 4) [larger pug]:

Row 1: mc; sc 6 into circle; pull closed (6 sts)
Rows 2-5: sc 1 into each st (6 sts/row)
**Finish off, leaving a long tail for sewing onto the body.

Legs (using Bone yarn) (Make 4) [smaller pug]:

Row 1: mc; sc 6 into circle; pull closed (6 sts)
Rows 2-4: sc 1 into each st (6 sts/row)
**Finish off, leaving a long tail for sewing onto the body.

Now, sew all of your little guy's body parts together and you're done! Wasn't that so easy?? 


This is the bigger guy!


This is the smaller one!


I hope you enjoy making oodles of these little cuties!

Feel free to give away or sell what you make from this pattern, but DO NOT claim this pattern as your own, adjust the pattern and re-brand it as your own, or sell this pattern. Also, please DO NOT use any of my photos. Thank you!!

Tuesday, April 10, 2018

Unicorn Amigurumi - Free Crochet Pattern


As I've made different crochet projects for friends and family and have had requests for repeats, I decided it was time to start writing down my patterns so that my products could be consistant. I've also decided to share my patterns for those who would like to make any of my projects on their own. I learned how to crochet thanks to the many free patterns and tutorials out there in the great wide world of the internet, and I want to give back to help out everyone else in any small way I can.
I'm not a professional by any means, so if my patterns are confusing, I apologize and will do what I can to clarify anything that is not readily understood. I'll do my best to post the instructions in the clearest way possible. In the near future, I'll also be posting video tutorials for different stitches and other basic crochet helps and tricks that I have learned along the way.
Here is the pattern for a cutesy unicorn I have developed. I wanted something with more of a baby and playful, yet still pretty feel to it. For this pattern, I will only abbreviate a few terms, and will write out a lot of the instructions to make it more very-beginner friendly. In future patterns, I'll shorten and abbreviate more.


Supplies:
     *Worsted Weight Yarn (size 4 - I used just a plain white for this unicorn, but obviously you can use any color). I'm not sure how much I used, but it's a fairly small unicorn, so I will estimate that you'll probably need less than 50 yards.
     *Size 3.50 mm Hook (for body, head, legs, and ears)
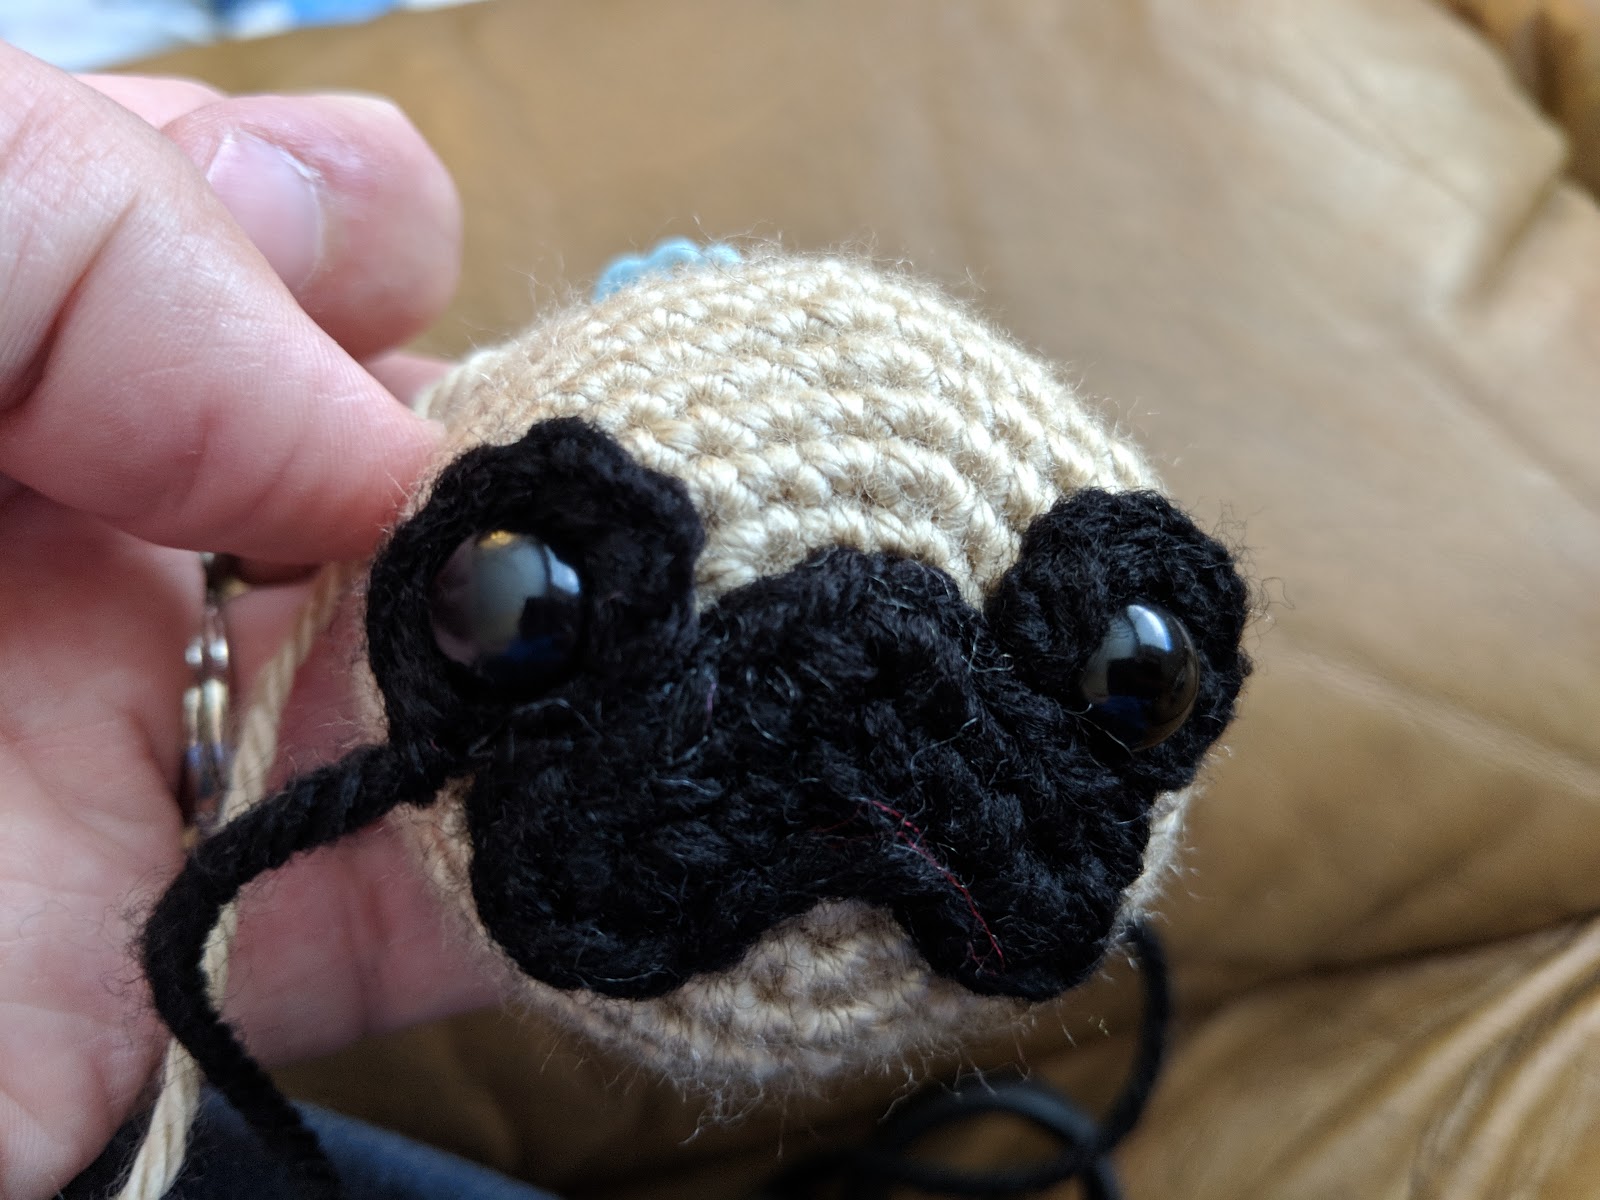
     *6 mm size Safety Eyes
     *Size 2.00 mm Hook (for the horn)
     *Small amount of Super Fine Yarn (size 1 - for the horn)
     *Small amounts of your choice of Yarn colors for the mane and tail
     *Thin yarn needle
     *polyester fiber-fill or another kind of stuffing
     *stitch markers, or a piece of yarn a different color from the one you're working with to keep track of the beginning of your rows.


Stitches/techniques we will be using:
     *magic circle
     *single crochet (noted as "sc")
     *increase single crochet (noted as "inc")
     *decrease single crochet (noted as "dec")
     ** we'll be working in the round for this project, which means there's no joining or chaining when going from one row to the next. You just keep working as you go.

INSTRUCTIONS:

Head:
     Row 1: Form a magic circle. Inside the magic circle, sc 6 and pull closed (6 stitches)
     Row 2: Increase around (2 sc in each stitch) (12 stitches)
     Row 3: sc in each stitch around. (12 stitches)
     Row 4: sc, inc, sc, inc, sc, inc, sc, inc, sc, inc, sc, inc (18 stitches)
     Rows 5 & 6: sc in each stitch around (18 stitches/row)
     Row 7: sc, sc, inc; repeat that pattern all the way around (24 stitches)
     Rows 8-10: sc in each stitch around (24 stitches/row) *Stop here and put in the eyes before continuing. I placed mine between rows 6&7, placing them 12 stitches apart from each other. You can place them anywhere you like, obviously!
     Row 11: sc, sc, dec; repeat pattern all the way around (18 stitches) *Start to stuff the head at this point, continuing to stuff as you finish it up.
     Row 12: sc, dec; repeat pattern all the way around (12 stitches)
     Row 13: decrease all the way around (6 stitches)
     *Finish off (I usually slip stitch into the next stitch and then pull my yarn all the way through) and weave in the ends.


Legs (Make 4):
     Row 1: Form and magic circle. Inside the magic circle, sc 6 and pull closed (6 stitches)
     Row 2: sc, inc; repeat pattern all the way around (9 stitches)
     Rows 3 & 4: sc in each stitch around (9 stitches/row) *Before starting the decrease, lightly stuff each of the feet to help them keep their shape and give them a little bit of weight.
     Row 5: dec once, sc in every other stitch around (8 stitches)
     Row 6: dec once, sc in every other stitch around (7 stitches)
     Row 7: dec once, sc in every other stitch around (6 stitches)
     Rows 8-10: sc in each stitch around (6 stitches)
     *Finish off, leaving a long tail for sewing onto the body.

Body:
 **The body can be made two ways, depending on where you want the decreases to be. This only changes the look of the body slightly. Again, it just changes where the decreases will be visible. I've done this body both ways, and will include instructions for both below**

Body (with decreases at top of body):   
     Row 1: Form a magic circle. Inside the magic circle, sc 6 and pull closed (6 stitches)
     Row 2: Inc around (12 stitches)
     Row 3: sc, inc; repeat pattern all the way around (18 stitches)
     Row 4: sc, sc, inc; repeat pattern all the way around (24 stitches)
     Row 5: sc in each stitch around (24 stitches)
     Row 6: sc, sc, sc, inc; repeat pattern all the way around (30 stitches)
     Rows 7 & 8: sc in each stitch around (30 stitches/row)
     Rows 9: sc, sc, sc, dec; repeat pattern all the way around (24 stitches)
     Rows 10 & 11: sc in each stitch around (24 stitches/row)
     Row 12: sc, sc, dec; repeat pattern all the way around (18 stitches)
     Rows 13-14: sc in each stitch around (18 stitches/row) *At this point, you can attach the legs if you want. I like to attach them before I finish off the body because it's easier for me to really secure the legs by sewing them on and then knotting the strings inside the body.
*Start to stuff the body, continuing to stuff as you finish it off.
     Row 15: sc, dec; repeat pattern all the way around (12 stitches)
     Row 16: decrease all the way around (6 stitches)
     *Finish off and weave in the ends.


Body (with decreases at bottom of body):
     Row 1: Form a magic circle. Inside the magic circle, sc 6 and pull closed (6 stitches)
     Row 2: inc in each stitch around (12 stitches)
     Row 3: sc, inc; repeat pattern all the way around (18 stitches)
     Rows 4 & 5: sc in each stitch around (18 stitches/row)
     Row 6: sc, sc, inc; repeat pattern all the way around (24 stitches)
     Rows 7 & 8: sc in each stitch around (24 stitches)
     Row 9: sc, sc, sc, inc; repeat pattern all the way around (30 stitches)
     Rows 10 & 11: sc in each stitch around (30 stitches/row)
     Row 12: sc, sc, sc, dec; repeat pattern all the way around (24 stitches)
     Row 13: sc in each stitch around (24 stitches)
     Row 14: sc, sc, dec; repeat pattern all the way around (18 stitches) *At this point, you can attach the legs and start to stuff the body. Continue stuffing as you finish off the body.
     Row 15: sc, dec; repeat pattern all the way around (12 stitches)
     Row 16: dec all the way around (6 stitches)
     *Finish off and weave in the ends.


Ears (Make 2):
     Row 1: Form a magic circle. Inside the magic circle, sc 4 (4 stitches)
     Rows 2 & 3: sc in each stitch (4 stitches/row)
     *Finish off and sew onto head.


Horn:
     *Using size 2.00 mm Hook & size 1/Super Fine yarn*
     Row 1: Form a magic circle. Inside the magic circle, sc 4 (4 stitches)
     Rows 2-4: sc in each stitch around (4 stitches/row)
     *Finish off, lightly stuff, then sew onto head.


**At this point, you can sew the head onto the body, and sew the legs on if you haven't already, and attach the hair. There are a few different ways you can attach it. I chose to attach mine by using my 2.00 mm crochet hook and inserting it under and back up through the back of one stitch. I took a piece of yarn, folded in half, grabbed it with the hook, then pulled it back up through the back of the stitch where my hook was inserted. I the grabbed the two loose ends and pulled them through the loop, and pulled it tight. If you want to make sure that the hair doesn't go anywhere, you could also knot it one more time at this point. I went in a straight line down the back of the unicorns head for the mane, starting slightly in front of the horn, and ending where the head and body join together. For the tail, I just took one strand of each color and bunched them very closely together to make a small tail.


And that's it, you're done!! Now, if you have a small boy in your life, or even a girl that's not into unicorns, you could very easily make this into a rhinoceros! All you would have to do it place the horn near the top end of the head, leave out the hair, and create a small tail  by chaining about 4-6 stitches, and then going back and slip stitching through each stitch to create a stiff tail.


Hopefully this pattern was fairly easy to follow, and I hope you have fun creating your little creatures! Feel free to give away or sell what you make from this pattern, but DO NOT claim this pattern as your own, adjust the pattern and re-brand it as your own, or sell this pattern. Also, please DO NOT use any of my photos. Thank you!!